
Overview: In this configuration guide, we will adjust the outbound gain of a Yealink T4X Phone registered to 3CX Phone System. We will accomplish this by customizing our T4 Provisioning Template. By changing our provisioning template, we can easily apply our custom changes to all of the Yealink T4X Phones registered to our system.
The same syntax changes can be applied to the configuration templates of Yealink T4X Phones registered to other phone systems, although the steps will vary from what is show here.
There are a few symptoms your clients may report that indicate you need to adjust the outbound gain on your Yealink T4X Phones:
-
The remote party cannot hear your client well.
This scenario indicates that the outbound volume on your Yealink T4X Phone is set too low, and you need to increase the outbound gain.
-
Your client sounds abrasive and distorted to the remote party.
This scenario gives the illusion that your phone has poor audio quality. However, this simply means that your outbound audio gain is set too high. Lowering the outbound gain is the key here.
-
Your client reports echo on their calls.
This scenario occurs when your client's audio is so loud that the remote party creates an acoustic echo during the call. This acoustic echo is caused by your client's audio projecting from the remote party's handset speaker right back to the remote party's handset microphone, occasionally combined with the echo of the room the remote party is in. Simply lower your client's outbound gain to remove this acoustic echo.
Configuration Guide: Adjusting the outbound gain of your Yealink T4X Phone can only be done by altering the phone's configuration file.
You will need to add the following parameters to your configuration file:
#Configure the sending volume of Speaker, Handset and Headset. It ranges from 1 to 53, the default values are 25, 35, 29.
#Require reboot;
voice.handfree_send = 25
voice.handset_send = 35
voice.headset_send = 29
We have also included the finished configuration files in .txt format here, so you can check your work and see how the finished configuration files will look.
Step 1: First, we need to locate the provisioning templates in order to customize them. Please ensure you can see your hidden files and folders, then navigate to "C:/ProgramData/3CX/Data/Http/Templates/phones". Next, copy the default templates "yealinkT4x.ph.xml" and "yealinkT46T48.ph.xml" and rename them as shown in the screenshot below:
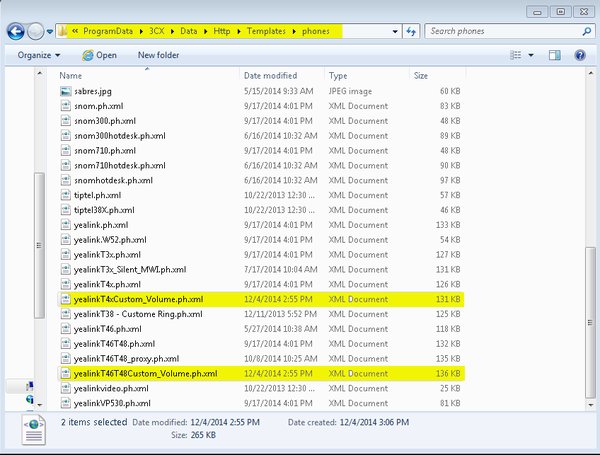
We edit a copy of the standard provisioning template instead of editing the original so our custom changes are not overwritten then next time a service pack with updated templates is released.
Step 2: Now that we have our custom template, we can continue towards adds our custom parameters. Now is the time to open your custom template in your favorite .XML editor. Here at 888VoIP, we like to use Notepad++.
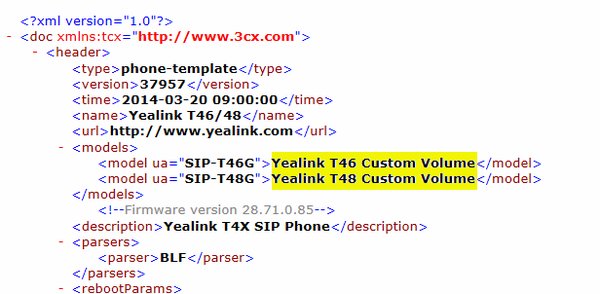
The first thing to edit in our custom template is the contents of the <models> tag. This dictates what is shown in the dropdown menu of the provisioning tab in the 3CX Management Console, and it is important to change so you will know which template to select when provisioning your phones. The <models> tag is located at the beginning of the template:
Step 3: Next we need to add the outbound gain configuration parameters below:
#Configure the sending volume of Speaker, Handset and Headset. It ranges from 1 to 53, the default values are 25, 35, 29.
#Require reboot;
voice.handfree_send = 25
voice.handset_send = 35
voice.headset_send = 29
A common practice for adding custom parameters is to place them at the end of the configuration file, so you can easily locate them if you need to tweak their values or add your custom changes to a new provisioning template that is released in the future.

Now that you have added the outbound gain parameters to your configuration file, go ahead and practice turning them up and down to familiarize yourself with how the settings affect the audio of your Yealink T4X Phone.
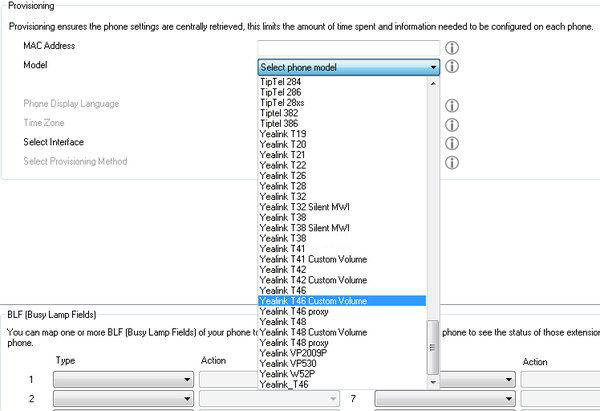
Congratulations, you have successfully adjusted the outbound gain of your Yealink T4X Phone with a custom configuration file! If you have been following along with 3CX Phone System, you will now see your custom template when Auto-Provisioning.
Steve Stoveld
Comments