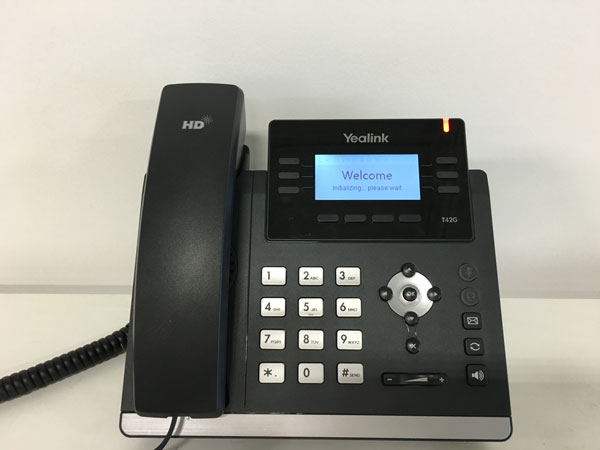
Overview: Also known as a Recovery Mode Update, the TFTP process can be used to save what can be seen as an otherwise dead phone. This process is most useful in the scenario that a phone either gets stuck in a boot loop, or stays on a Welcome Initializing...Please Wait screen. However, it can also be useful on a device where a factory reset does not seem to be resetting the device correctly. If you find that your device fits into any of these categories, the TFTP recovery can be performed; it will reflash the firmware on the device in the case of a corrupt firmware and if successful, will allow your device to fully boot again.
Set-up Guide: In order to proceed with this process and be able to successfully perform the TFTP recovery, you are going to need:
- We will be using the PumpKIN TFTP Server in this guide but you can substitute this with a TFTP program of your choice, however the guide will not be covering how to configure those.
- PC with web access
- Phone on the same network as that PC.
Step 1: Gathering the Necessary Files
You will be able to find the necessary recovery files for your device at the following URL Yealink Support. You will need to provide the proper .rom file renamed. So for example, if your device is a T46U you would rename your rom file to T46U.rom. All rom files can be obtained from the yealink website.
From here, you can navigate to the folder for the device that you will be trying to recover, inside of that folder you will find all of the files necessary to perform the TFTP recovery on that device. Download these files and place them in a folder that you will have easy access to. Make sure that you have downloaded all the files in your devices folder, the process will not be successful if you have not acquired all of the files necessary for your device.
Step 2: Setting Up Your TFTP Server
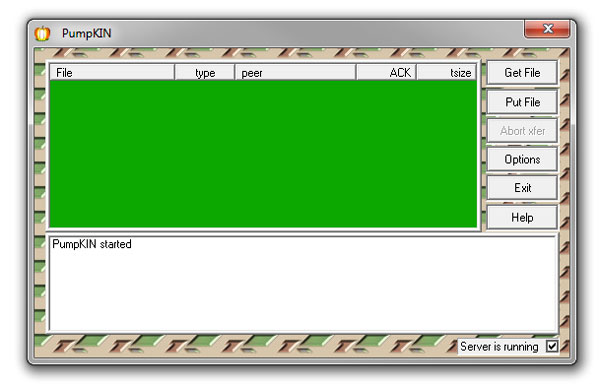
The process to setup your TFTP server is not overly difficult. Once downloaded from the link above, allow PumpKIN to install and then open it once it is installed. You will see a screen as below.
Now, you are going to want to hit the options button and you will be presented with a screen as shown below.
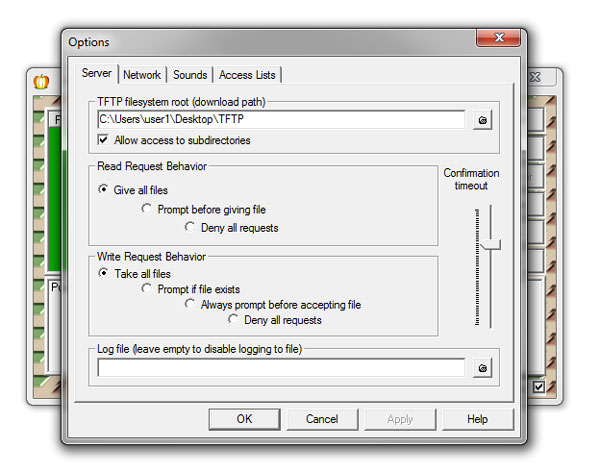
On this screen, you are going to want to set the TFTP filesystem root to the folder that you downloaded the files from above in, in this examples case, they are located in a TFTP folder that is on my desktop. You will also want to ensure that you change the read request behavior to give all files and the write request behavior to take all files, so that way the TFTP program will know to allow the phone to request all of the files it is looking for in that folder. Once this is done you can click OK to save your changes and you are ready to move on to the next step.
Step 3: TFTP Recovery
Depending upon what device you are going to be recovering, this process will deviate slightly.
- T4x, T3x, T2x, T19 and CP860
Step 1: With your device off, press and hold down on the speakerphone button. While holding this button down, either plug in the power adapter or reinsert your PoE cable. Keep holding this button down until you are presented with a screen as shown below.
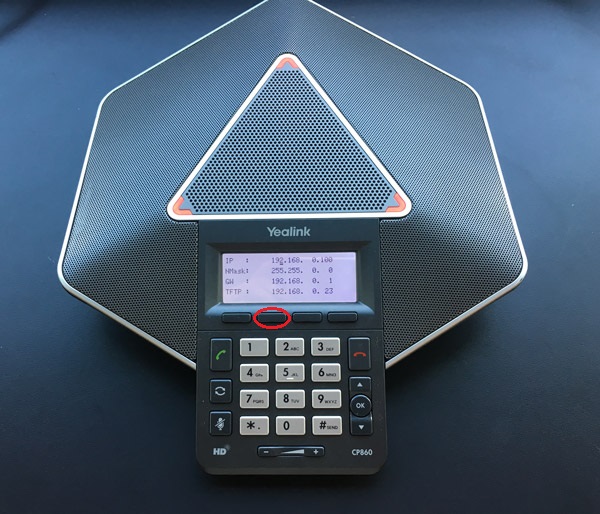
***Please Note*** The CP860 follows a slightly different process, instead of holding down the speakerphone button during this process, you will be holding down the second soft key button from the left as there is no speakerphone button to hold down on the CP860. This is circled in the picture below.
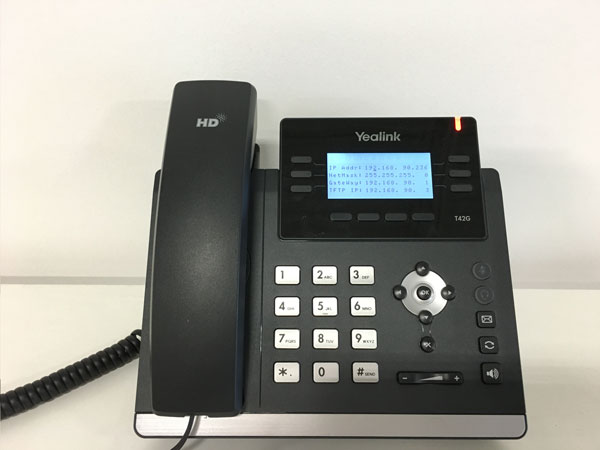
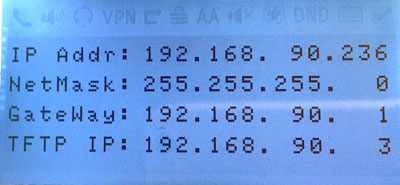
Step 2: On this screen you will see 4 options, IP Addr:, NetMask:, GateWay:, and TFTP IP: as pictured below. For the IP Addr:, you are going to want to insert an unused IP address that is available on your network, in our example we are using 192.168.90.236. Next, for the NetMask:, you are going to want to insert the subnet mask that your network is operating under, in our example we are using 255.255.255.0. However, this can be different depending upon your network configuration. Next, for the GateWay:, you are going to want to insert the IP address that your router is located at, in our example that would be 192.168.90.1. Finally, you are going to want to insert the IP address of your PC that is hosting PumpKIN for the TFTP IP:. Our TFTP server is located on a PC at IP 192.168.90.3 so we inserted that value for our TFTP IP:. Now, in the case that you are not aware of your network details, please contact your network administrator and they can help you get that information. Once you have filled these details out, press the OK key on the phone and it will start requesting the files that you downloaded from earlier.
Step 3: The process can take several minutes to complete and during that time you will see a ...Updating...Please Wait displayed on the screen. Allow it to complete it's process, and the phone will reboot once it is complete. If it was a successful flash, you will be presented with a factory reset device that has been recovered. If you are presented with an Update Fail... screen you will want to ensure that the details that you entered on the phone are correct and that you have pointed PumpKIN at the correct folder. Also, please ensure that you have downloaded the correct files and all of the files necessary for your device.
- W52P
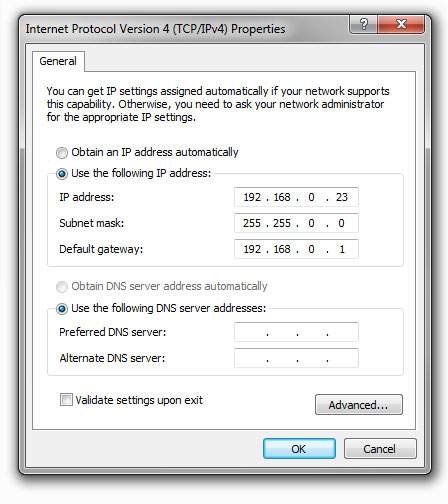
Step 1: The process to recover a W52P base unit is slightly different when compared to recovering a phone. First, you will need to get the IP address information on your PC that will be hosting PumpKIN as configured below, these are the default values that the W52P will look for when put into recovery mode.
Step 2: During this process the base unit will get an IP address of 192.168.0.100 and will look to the IP address as configured above for its recovery files. While the unit is off, long press the button on the front of the device, it looks like a small dot with three waves eminating out from the center. While continuing to hold this button reconnect your power adapter or PoE cable. Continue holding until you see the three lights on the base unit turn on one by one (power led --> network led --> phone led)
Step 3: This process can take several minutes to complete, however once sucessful the unit will reboot and once you have solid lights on the front of the device you will be able to access the device at the IP address that it has received from DHCP.
Once the steps above have been completed sucessfully, your device will have rebooted and you will have sucessfully recovered your device.
Steve Stoveld
Comments
Daniel Krueger
This is really great. Unfortunately I need a "T33G.bin" file in addition to the .rom file. Does anyone know how to get this file?
Darren
Can someone share the Google Drive link?
Arash Fattahi
I have requested access to the Google Drive but have not received any response. Could you please make that drive accessible? Thanks.
Lucas Burdick
I would also like access to the files. thank you!
mempht
can you accept my request to the drive folder?
Mohammed Mahdi
Can you please make the google drive files accessible? I tried requesting access and have not yet received a response.
Константин Долинин
Shared Google Drive with necessary files is not accessible now. Could you open access to it again?
saber Moazenzadeh
After Recovery VP59 , after updating phone restart after that restart after restart ....
what can i do?
Ian Yates
Great article. I used this information to "downgrade" my T46S phones from Skype for Business mode back to the regular firmware.
Yisroel Adler
What would be the process to put the Yealink CP960 phone into recovery mode?